The pharmaceutical industry uses the approach of
combinatorial chemistry—combining building blocks—to create large libraries of
compounds. A recent article (B. A.
Morgan, et. al, “Design, synthesis
and selection of DNA-encoded small-molecule libraries”, Nat. Chem. Biol., August, 2009) describes the synthesis of a
library containing 800 million small molecules.
These libraries can be used to screen for, e.g., antibiotic
activity. Usually, the compounds in
these libraries are tested individually, rather than as mixtures. (The process called “high throughput
screening” uses automation to screen thousands of compounds per day.)
Resources
Jiju Antony, “Design of Experiments
for Engineers and Scientists”, Butterworth-Heinemann, 2003.
http://www.itl.nist.gov/div898/handbook/pri/section3/pri3.htm Experimental design is presented on the NIST
web site.
Identification of an antibiotic by the “cup agar diffusion” method
The mixtures will be screened for antibiotic activity using
the cup agar diffusion method. The
bottom of Petri dishes (pronounced “pē-trē”) is covered with a layer of warm
agar that, when cooled, solidifies. Small
holes, or “cups” are bored in the agar using a hollow glass tube. A couple of milliliters of a solution
containing E. coli is poured into the
Petri dish to cover the surface; the excess is poured off. To each of the cups is added about two drops
of one of the mixtures. Over the next
week that solution will diffuse out from the cup through the agar. The result is that, if the mixture contains
an antibiotic, no bacterial colonies will be visible around the cups.
Hazards associated with E. Coli
News reports occasionally describe cases of people getting
seriously sick from ingesting the bacteria,
Escherichia coli, or E. coli. Since we are using E. coli in this lab, an explanation is in order.
E. coli exists as
several different strains. Whereas some
of them are dangerous, others are fairly safe.
In fact, E. coli is part of
the normal flora of the intestines of humans, cattle, and swine. In other words, E. coli is growing in your intestine right now.
Some strains of E.
coli do cause disease. These strains
contain genes not found in the harmless organisms. These genes allow the bacteria to
produce toxins and proteins that enable
the bacteria to invade cells within the body.
Several diseases are associated with these E. coli strains. Some E. coli strains are responsible for the
travelers' diarrhea; others are associated with hemolytic-uremic syndrome,
which is sometimes fatal.
The strains of E. coli
usually used in molecular biology research do not contain the genes that
produce disease, so these strains are normally harmless. (The strain we are using is “7A”.) However, even the strains of E. coli normally present in humans can
cause illness if the bacteria escapes the digestive tract, so laboratory
strains might cause an infection if introduced into a cut or into the eye. Therefore, some safety precautions should be
taken when handling the organism. In
fact, every day, hundreds of scientists and students handle E. coli without any noteworthy
consequences.
Handling E. coli
Here are some techniques for safely handling E. coli.
·
When the liquid suspensions of the bacteria are
being transferred, keep the nose and mouth away from the transfer areas to
avoid inhaling any aerosol that might be created.
·
At the end of laboratory sessions, wipe down
bench top with a 10% bleach solution. (Soapy
water or a disinfectant may be used instead).
·
Wash your hands before leaving laboratory.
·
Disinfect all bacterial cultures and any
material that may have come into contact with the cultures, such as tubes and
pipets. This may be done by placing these
materials in a 10% bleach solution for 15 min.
After that, the material may be disposed of in the garbage or down the
drain. (Alternatively, the material may
be autoclaved.)
Chemical Hazards
The chemicals used in this experiment are not toxic in the
amounts used. For example, for compound
A1, 2-nitrobenzaldehyde, to be toxic to a typical adult, 18,000 mg would have
to be consumed orally, whereas only about 60 mg of this compound is used for
the entire class. Nevertheless, some of
these compounds are skin and eye irritants, so avoid contact with these
compounds, and wash your hands before leaving the laboratory.
Student tasks
Prepare sterile Luria-Bertani agar for solid culture Petri dishes
To make 1 L of LB agar, combine 40 g dehydrated LB agar and 950 mL
deionized H2O in a large Erlenmeyer flask with a stir bar. Cover with an upside-down 250 mL beaker to
keep bacteria out. Sterilize by boiling
the solution for a few minutes on a hot plate.
Prepare components of the mixtures
Prepare a
water bath for a 50 mL conical flask by adding enough water to a 400 mL beaker
to cover 24 mL of the water in the conical flask. Heat the bath to a gentle boil in a
hood. Prepare a large label with one of
the following IDs: "1{1}," "1{2}," "1{3},"
"2{1}," "2{2}," and "2{3}". Attach the label in front of the bath to the
floor of the hood.
(Each bath
goes in a separate hood, so that contamination is reduced.)
For each chemical
listed below, add the listed mass to the appropriate conical flask.
|
ID
|
Compound Name
|
Molecular Weight
(MW)
|
mass to add (mg)
|
|
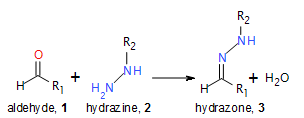
1{1}
|
2-nitrobenzaldehyde
|
151.12
|
108
|
|
1{2}
|
3-nitrobenzaldehyde
|
151.12
|
108
|
|
1{3}
|
5-nitro-2-furaldehyde
|
141.09
|
102
|
|
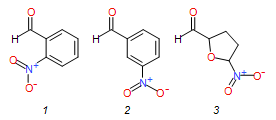
2{1}
|
4-bromophenylhydrazine
hydrochloride
|
223.52
|
160
|
|
2{2}
|
4-cyanophenylhydrazine
hydrochloride
|
169.62
|
122
|
|
2{3}
|
aminoguanidine
bicarbonate
|
136.11
|
94
|
To each conical flask, add 24 mL of
deionized water, using the marks gradations on the side of the flask. This will make the concentration of the solutions
0.030 M. The concentrations of the
solutions need to be correct. If, in
weighing out the chemical, too much or too little is added, adjust the volume
of water so as to obtain the correct concentration. For instance, if you weighed out 120 mg of 1{1} instead of 108 mg, add 120/108 *
12 = 13.3 mL of water, instead of 12 mL.
Most of the chemicals will not dissolve in water at room
temperature. Gently cap the flasks and
place them in the boiling water bath.
After about 3 to 5 min of heating, the solids should dissolve when the
tubes are shaken.
Keep the
solutions in the boiling water bath until they are used in the experiment. (The solutions may be stored at room
temperature until needed.)
Prepare 1/100 dilutions of "overnight culture"
Prepare 100
mL of Luria-Bertani broth by adding 2.5 g of dehydrated LB Broth to 95 mL
deionized H2O. Boil to
sterilize, then cool in a water bath, so the heat won’t kill the E. coli.
Use the gradations on the sides of the centrifuge tubes to estimate the
necessary volumes in the following dilutions.
Label a 15 mL sterile conical test tube "E. coli 1/10"
Label 6 15 mL sterile conical test tubes "E. coli 1/100"
Pour about 9 mL of the cooled, sterile LB media into each of
the seven test tubes.
Pour 1 mL of the E. coli overnight culture into the tube
marked E. coli 1/10. Cap this tube and
invert it several times to mix.
Pour 1 mL of the E. coli 1/10 dilution into each of the
tubes marked E. coli 1/100. Cap the
1/100 dilutions and invert them several times to mix. Keep the 1/100 dilutions at room temperature
until they are used in the experiment.
Procedure
Note: To
prevent organisms in the air from growing in the Petri dishes, only uncover the
dishes when essential, and quickly cover them again.
 1. Label. The bottom of the Petri dish is the smaller
half, which fits inside the top half. Do
not separate the top and bottom in this step, so that the interior remains
sterile. The bottoms of two petri dishes
need to be labeled to indicate which mixture is where, as shown below. Using the provided marker, divide each Petri
dish into 3 sections. Label the sections
of one dish M1, M2, M3, and the sections of the second dish M4, M5, M6. Also, place your initials on the dishes so
you can distinguish them from your classmates.
1. Label. The bottom of the Petri dish is the smaller
half, which fits inside the top half. Do
not separate the top and bottom in this step, so that the interior remains
sterile. The bottoms of two petri dishes
need to be labeled to indicate which mixture is where, as shown below. Using the provided marker, divide each Petri
dish into 3 sections. Label the sections
of one dish M1, M2, M3, and the sections of the second dish M4, M5, M6. Also, place your initials on the dishes so
you can distinguish them from your classmates.
2. Add agar. Pour about 10 mL of the hot (around 65 °C)
sterile LB agar into each of 3 sterile Petri dishes (two of them are labeled). Cover the plates and let them cool for about
45 minutes. During that time the agar
will solidify. Meanwhile, do steps 3
through 5.
3. Label tubes for mixtures. Obtain six 1.5 mL microcentrifuge tubes. Label them M1, M2, M3, M4, M5, and M6.
4. Prepare the mixtures. Using plastic disposable transfer pipets,
prepare the mixtures according to the table, below. To prevent contamination, use a different
pipet for each solution. The order of
addition may be significant, so add the reagents in the order shown
and add the correct number of drops. For example, to prepare M1, add 5 drops of 2{1} to tube M1, then add 5 drops of 2{2} to that tube, then add 5 drops 2{3}, then 15 drops 1{1}.
Cap and shake to mix each mixture.
|
Tube
|
Add 5 drops of
|
then 5 drops of
|
then 5 drops of
|
then 15 drops of
|
|
M1
|
2{1}
|
2{2}
|
2{3}
|
1{1}
|
|
M2
|
2{1}
|
2{2}
|
2{3}
|
1{2}
|
|
M3
|
2{1}
|
2{2}
|
2{3}
|
1{3}
|
|
M4
|
1{1}
|
1{2}
|
1{3}
|
2{1}
|
|
M5
|
1{1}
|
1{2}
|
1{3}
|
2{2}
|
|
M6
|
1{1}
|
1{2}
|
1{3}
|
2{3}
|
Record any observations made during the additions:
M1 M4
M2 M5
M3 M6
5. Cap the tubes and shake them for 10 to 15 seconds. Again record any observations of the
mixtures:
M1 M4
M2 M5
M3 M6
6. Add bacteria. Pour about 5 mL of the bacterial culture E.
coli TG1 1/100 onto one of the agar plates.
Cover the plate and gently swirl it to ensure that the liquid culture makes
contact with all of the solid agar.
7. Pour the excess liquid culture onto the second labeled
dish. As always, keep the plates
uncovered as little as possible. As
before, cover it and swirl it to coat the plate with the liquid culture.
8. Pour the excess liquid culture in this dish back into the E.
coli TG1 1/100 test tube.
9. Remove the excess liquid from each labeled plate by tilting the
plate on edge and using a Pasteur pipet to suck up the liquid that collects at
the bottom edge of the plate. Transfer this
excess liquid back into the E. coli TG1 1/100 test tube. Dispose of the transfer pipet in the E. coli waste container at the front of
the lab.
10. Make cups. Use the unlabeled Petri dish to practice
making cups in the agar. Press straight
down into the agar with the large end of a glass Pasteur pipet, then lift
straight up. This leaves a little disc
of agar on the plate. Dislodge the disc
from the Petri dish by placing the small end of the pipet into the bottom of
the crevice around the disk, and then leveraging the disk out. Though not contaminated, this disk may be
placed in the E. coli waste container
for disposal.
11. Use the Pasteur pipet to make cups in the center of each section
of the labeled plates. A bottom view of
the plate is shown below. Dispose of the
glass pasteur pipet in the large beaker containing bleach in a hood at the
front of the lab.

12. Place the mixtures in the
cups. Using a new transfer
pipet for each mixture, transfer 2 drops of each mixture to the corresponding
cup in the agar plates. To get the
solution into the cup can be tricky. To
do the job, (assuming you are right-handed) hold the Pasteur pipet in your
right hand. Rest your left fist on the bench
top near the plates and use your left index finger to steady the tip of the
pipet.
13. Incubate. Carry the plates to the incubator, being
careful not to let the liquid spill out of the cups. The the two agar plates will be incubate at
37 °C for 24 h, at which time the instructor will remove them to the
refrigerator. They will be analyzed
during the next lab period.
Data Analysis
1. Record the results of the experiment in
the table below. For each mixture place
a "–" in the table if the mixture inhibited growth, or "+" if the mixture that did not inhibit
growth.
|
Mixture
|
Contents
|
Result
|
|
M1
|
1{1},
2{1}, 2{2}, 2{3}
|
|
|
M2
|
1{2},
2{1}, 2{2}, 2{3}
|
|
|
M3
|
1{3},
2{1}, 2{2}, 2{3}
|
|
|
M4
|
2{1},
1{1}, 1{2}, 1{3}
|
|
|
M5
|
2{2},
1{1}, 1{2}, 1{3}
|
|
|
M6
|
2{3},
1{1}, 1{2}, 1{3}
|
|
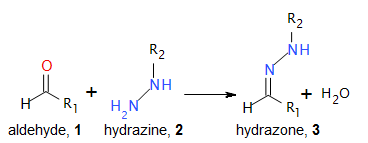
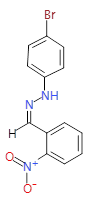
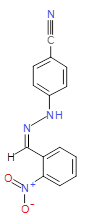
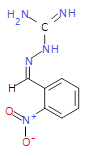
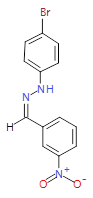
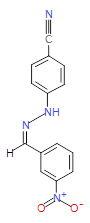
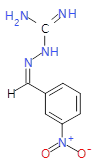
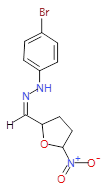
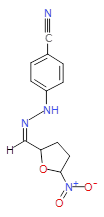
Each mixture’s components
react to produce three compounds. For
instance, M1 contains the compounds 3{1,1},
3{1,2}, and 3{1,3}. Therefore, in the
mixtures that show inhibition of growth (antibiotic activity) there are three
compounds.
2. Determine which compounds formed when
one of the chemset 1 compounds combined
with one of the chemset 2 compounds. As shown in the table below, when the
starting material 1{1} combines with
the starting material 2{1}, the
product 3{1,1} is formed. Fill in the
empty cells in the table.
|
|
2{1}
|
2{2}
|
2{3}
|
|
1{1}
|
3{1,1}
|
3{1,2}
|
|
|
1{2}
|
3{2,1}
|
|
|
|
1{3}
|
|
|
|
3. Determine which components are in each
mixture. The components of the six
mixtures are given by the components in one of the three rows or one of the
three columns. For example, in the table
below, left, the shaded row lists the three components of M1. Likewise, in the table below, right, the
shaded column lists the components of M4.
(Just copy the results above to the two tables below.)
|
|
|
M4

|
M5
|
M6
|
|
|
|
2{1}
|
2{2}
|
2{3}
|
|
M1 
|
1{1}
|
3{1,1}
|
3{1,2}
|
|
|
M2
|
1{2}
|
3{2,1}
|
|
|
|
M3
|
1{3}
|
|
|
|
|
|
|
M4
|
M5
|
M6
|
|
|
|
2{1}
|
2{2}
|
2{3}
|
|
M1
|
1{1}
|
3{1,1}
|
3{1,2}
|
|
|
M2
|
1{2}
|
3{2,1}
|
|
|
|
M3
|
1{3}
|
|
|
|
4. Determine which compound is an antibiotic. If one particular compound acts as an
antibiotic, then two mixtures will show antibiotic behavior: The “row” mixture containing that compound,
and the “column” mixture containing that compound. In the table below, fill in the empty cells
(just as you did previously), and shade the columns and rows corresponding to
mixtures that acted as antibiotics.
Determine which of the nine compounds is the antibiotic, and circle it
in the table.
|
|
|
M4
|
M5
|
M6
|
|
|
|
2{1}
|
2{2}
|
2{3}
|
|
M1
|
1{1}
|
3{1,1}
|
3{1,2}
|
|
|
M2
|
1{2}
|
3{2,1}
|
|
|
|
M3
|
1{3}
|
|
|
|
Questions
about factorial design
5. How
many separate reactions would need to be carried out to synthesize each of the
chemset 3 compounds?
6. How
many tests would need to be carried out to screen each compound individually
for antibiotic activity?
7. How
many separate reaction mixtures were actually prepared?
8. How
many separate antibiotic activity tests were actually carried?
9. Consider
a larger system, one with 10 hydrazines and 10 aldehydes. How many possible hydrazones can be made from
these starting materials?
10. Using the factorial
design method, how many mixtures (and antibiotic screenings) would be necessary
to identify which one of the hydrazones is an antibiotic?
11. For today’s
lab, the fraction  . What is that fraction for the system with 10
hydrazines and 10 aldehydes?
. What is that fraction for the system with 10
hydrazines and 10 aldehydes?
12. Suppose the
results of a factorial design experiment gave the following results. (The shaded area indicates mixtures that
tested positive for antibiotic activity.)
Can the antibiotic compound be unambiguously determined from this data? (Explain)
|
|
|
M9
|
M10
|
M11
|
M12
|
M13
|
M14
|
M15
|
M16
|
|
|
|
2{1}
|
2{2}
|
2{3}
|
2{4}
|
2{5}
|
2{6}
|
2{7}
|
2{8}
|
|
M1
|
1{1}
|
|
|
|
|
|
|
|
|
|
M2
|
1{2}
|
|
|
|
|
|
|
|
|
|
M3
|
1{3}
|
|
|
|
|
|
|
|
|
|
M4
|
1{4}
|
|
|
|
|
|
|
|
|
|
M5
|
1{5}
|
|
|
|
|
|
|
|
|
|
M6
|
1{6}
|
|
|
|
|
|
|
|
|
|
M7
|
1{7}
|
|
|
|
|
|
|
|
|
|
M8
|
1{8}
|
|
|
|
|
|
|
|
|